Planning
For this task, I would be making another hybrid music production which required me to research, ideate, design, conceptualize, and originate a hybrid genre EP with artwork that fuses elements from different genres. I would once again decide to make a hybrid Rock/Hip hop mix which would fuse elements of rock with hip hop but unlike my previous rock hip hop hybrid production this would be more rock focused with a few drum elements and melodies from the Hip hop genre. With the many sub genres existing in todays time I was spoiled with many choices of various styles to go with. since my main instrument would be a guitar I would narrow down my choices to guitar songs or riffs and grooves I could think off the top of my head or even songs that inspire me. once had a rough idea of my starting direction for my hybrid production I would begin to brainstorm on how I would approach this remix as my previous hybrid song did not feel much as a hybrid genre to me as the song had separate parts in the composition which was one or the other genre but not the two fused together. I previously had questioned myself in regards to what is the definition of a hybrid genre and if a sub genre is defined as a hybrid genre? After researching further on the definition or meaning of a hybrid genre I would learn that a hybrid genre or fusion would be the merging of 2 genres with elements of both used in combination. With this in mind I would choose to make this song a blend of two genres into one rather than keeping the genres sounds and elements separate from each other like my previous hybrid song. Although my main intention was to merge 2 songs of different genres together I would also be adding elements from other genres such as classical to give my composition a theme.
I would begin my Hybrid production by loading a Harp library from Kontakt and would improvise freely a catchy melody or chord progression. I would keep in mind that my theme was going to have some classical elements fused with hip hop and rock so I would use the melodic composition to have classical elements. After improvising an idea I would stumble across a simple melody which was just 2 notes played in unison. One note would move up a semitone mid way of the progression which gave the simple melody a nice movement to work creatively with. I would record this melody and would route the signal to an aux track in where i would insert a granular effect plugin. This plugin would not only make granular samples of my original audio but has the ability to time stretch and manipulate the start and end time of the granular drones. I would set the plugin to operate at half the time of the original audio and have the drones to be offset slightly to the original melody. This in turn would create a counter melody which works great with the original melody. I would record this granular effect as a wav file so I can further manipulate the sound rather than just relying on a side chained signal which has less control for sound designing in comparison to a wav file. With the granular sound recorded I would slice the wav file and would align it to fit in with my other melodic compositions. To finish off this melody I would again side chain the original signal to an aux track and would load a plugin which would turn any fed audio into a large granular drone sound with reverb.
My next task would be to further enhance the sounds I created as some of the sounds were too thin and needed some compression to control the dynamics. I would use a multiband compressor to compress only the mid frequencies of the large drone sound as I wanted the mid range frequency to be heard more than the other ends of the spectrum. this help the sound to sit nicely in the mix with the other sounds. I would next insert a time manipulating plugin called Flex beat by Akai which would enable me to make stuttering effects on my harp melody I created. I would experiment with various presets until I would form my own settings using a preset as a foundation to work with. I would layer just a small section of the newly formed stutter audio into my song at a points of transitions in the melody giving the overall melody movement and less of a monotone sound. From this point on I would insert a scale and key finder tool which analyses the audio and gives me three suggested keys which help me to compose something new in the right key of the song. After figuring out the key of the song I would work on another melody which I would layer at the chorus section of the song. The composition so far had given the song an emotional feeling which I would ensure my next sound selection would compliment the mood and the theme I had in mind. I would load a Kontakt library called cloud supply which had great ambient sounds. I would compose a short airy melody and would insert a large reverb on the sound to give it an atmospheric feel and sound design. I wanted to keep it simple so I would edit the notes to play sparsely.
The last section of my layers of melody would be a vocal engine in Kontakt from Soundiron called Voice of Adey. This engine has beautiful sounding vocals which I wanted to use with the melodies as I felt it would compliment the dreamy feeling the melodies formed all together. I would begin improvising an idea which would start with just a single note repetitively played in time with the other melodies. I would layer more notes with this base melody to form a progressive vocal melody and would finish off by creating a chord progression with the vocals to compliment the vocal melody. Once all was playing together it would sound angelic and worked perfect with the other melodies. I would consolidate this into a wav file and this would finalise the foundation of the melodic composition for the song. I would finish off by adding a Hi-hat sample and finger clicks to give the composition an RnB Hip-Hop groove.
With the classical genre inspired melodies done I would begin My next task in fusing the rock elements into the composition. I would be using my electric guitar which I have routed into Guitar Rig 7 Which emulates guitar amps, cabinets and processing chains commonly used. I would cycle through various guitar tones and had in mind a heavy rock inspired guitar tone. my thought process in selecting a sound usually involves messing around with the sound by either performing common rock playing techniques on the guitar such as slides, pull offs, string bends, power chords and hammer techniques. by doing this I am able to test how flexible is the sound I am working with as some presets would work great with these techniques whilst some would just turn out bad due to heavy distortion or lack of sustain when strumming a note. During this time I would also figure out the key on my guitar and would find the pentatonic scale for that key to figure out some ideas to play on the guitar alongside the composition. After experimenting with various sounds I loved how power chords changed the whole composition into something unique. Especially when palm muted as it would give a crunchy texture to the guitar sound. it had felt as though a fusion had taken place when I liked the outcome of power chords played alongside the melody as all of a sudden the groove changed and sounded different. I would arm a track with the guitar as my input and would begin recording the power chord progression. I would then load an EQ to enhance the high Mids and low end of my guitar sound as I wanted the guitar to sound beefy and more exciting
Upon playback I had noticed that my playing was off time and did not sound good. in order for me to correct this I am able to insert a plugin called melodyne which is usually used as pitch correction tool but I have learnt over time to use this tool as a way of repairing many audio which requires a natural sound whilst modifying elements such as pitch and time. I would sample my guitar power chords and melodyne is then able to automatically figure out the projects tempo which in turn enables me to adjust my playing to be on time whilst still preserving a natural performance. I did not need any pitch correction as the power chords are just 2 notes ( a root note and the fifth of the scale). I would also correct the timing of chords I had recorded later to help make the song feel cohesive.
Once I had my power chords fused in with the other classical elements and hip hop rock style drums I wanted to add something that would give a signature sound of a genre style as a way to stamp a dominant genre on the song. I would find what I call a "surf" style guitar sound and would improvise a chord progression played in a laid back fashion to give an old school relaxed style of rock song. I would also insert a reverb plugin on the guitar to give the guitar an atmospheric feel as I felt this would capture feelings towards the composition and sounds a listener would hear when the song plays. I would record 5 takes and would carry out a composition to form one take out of all the good takes by slicing out and removing all bad takes leaving all the good performances being used. Once I was happy with the overall outcome I would consolidate the performance into a single wav file ready to place in the composition.
To begin my mixing session in the box I would route all audio into mixer tracks and would set the levels to an optimal point whilst also following the judgement of my ears more than visual judgement and meters. whilst the song was playing I would often critically listen to parts of the song and solo instruments to further refine the audio with processing such as EQ, dynamics or effects. I have also learnt that not every sound needs processing as some sounds already have had processing work done whilst others sound great and only would need minor adjustments. In my case the drums were very clean and sounded great meaning I only would need to set the levels and other adjustments such as setting low end instruments in mono for better control and less phase issues. Also panning some sounds to give each their respective space for clarity and less masking issues. I had also the recordings of the room the drums were played in which I would ensure to sit well in the mix as this would have bleed of every instrument and would have great characteristics when blended in parallel with the other drum sounds specifically the snare as when the volume is just right with the dry drums the room snare sound can give the infamous reggae dub "hall snare" sound. Once I was happy with my drums I would move onto the other sounds starting with the guitar power chords. I would insert an optical compressor (LA2A) to fatten up the power chords and would set the levels so it would sit alongside the drum mix. I would also route the vocal sounds to an aux track in which I would insert a reverb to help it to sit well in the mix amongst the heavy drums and also I would spread the dreamy vocals into the stereo field more. I would also load the guitar chorus recording into an aux track with a reverb plugin but this would be a plate reverb which made the guitar sound lush and dreamy. after revisiting and checking my levels on later listens I would save this and render it into a stereo file ready for the mastering stage.
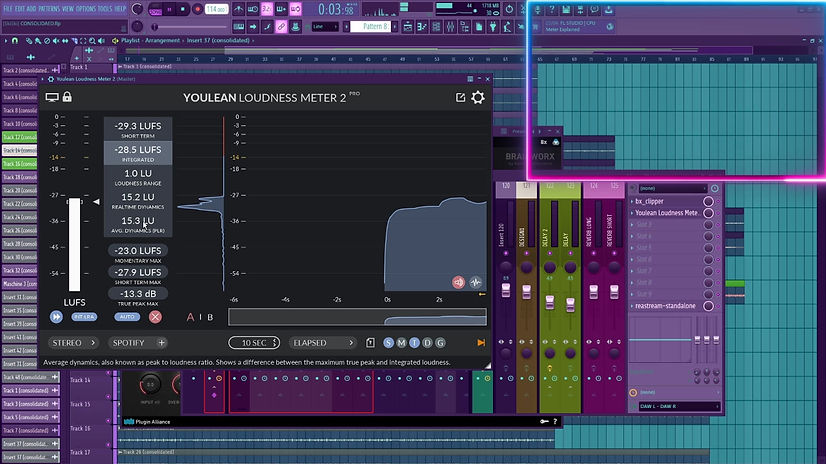
In my mastering stage I would ensure I have no phase issues in my stereo mix and that my session is organised and ready. On my mastering track I would have a loudness meter plugin loaded which would help me to understand the songs true perceived loudness and other factors such as the dynamic range of the song. It also helps me to achieve the target loudness for streaming services, TV or film services such as Spotify, Apple, Netflix Amazon and HBO to name a few. I would also insert a tonal balance plugin on the master track which helps me to fine tune my master using EQ target curves from different genres of great mastered tracks. this serves as a reference and a way for me to analyse my master amongst other masters of similar genre. I would begin by listening through and checking the average loudness and the dynamic range of the whole song. My mastering loudness target was to be for the online streaming service Spotify which was -14 LUFS. I would firstly insert a clipper to push the loudness of my stereo track while still maintaining a clean and dynamic sound by removing unwanted distortion and the peaks of my volume at a certain threshold. I adjusted the levels to a point the audio was loud but also only just the peaks of the low end was clipped as the kicks would be the dominant sound that would be pushing into the red. Once I was happy with the loudness I would do an on and off test (A/B) to check the difference and my meters to see how much headroom was present. I would next insert a mastering suite software in which I would load an EQ first in the chain. I would cut off all frequencies below 36hz and above 15khz as I felt these areas contained either frequencies humans couldn't hear and harsh frequencies in the high end of frequency range. I have learnt over time not always to cut the low end or insert low cut filters as some genres depend on the low ends haptic feedback as its more felt then heard. Especially when the environment is that of a club or concert which can make songs hit harder due to the heavy low-end. I would also solo frequencies to audit the audio at the specific EQ points. One example can be seen where I was searching for the kicks thump to boost the transient punch of the kick. I would raise the EQ point to hear better the starting point of the kick and would then lower the EQ point so that the kicks thump is more present but subtly adjusted to sit well in the context of the mix of other sounds. Overall the EQ curve shape on my master follows the infamous Mid scoop or "smiley face" EQ curve which is a practice which helps music listened at lower volumes and helps emphasize the low end and high end giving the song more energy. At times this can be a disadvantage as it means boosting the low and high ends which is my reason in cutting or controlling some of the ends of the frequency spectrum when applying a smiley face EQ. I would have my EQ set to Mid side mode and I would edit the sides by adding a low cut filter which isn't as steep as the Mids but cuts a lot of low end frequency. I would also dip the Mids slightly as most of the audio in the Mids was not clear. I would listen to the overall progress and check the levels and other information such as loudness, tonal balance and dynamic range of the song. I would finish off my mastering chain with 2 limiters to push the song to my target loudness and also to bring the whole song to that final polish. My reason of using 2 limiters is that it helps reduce the load on one limiter which can be handy when using one limiter to catch the peaks and harsh transients while the other limiter focuses on increasing the overall loudness. I would have my 1st limiter catching the peaks of the audio and would have the "character" or attack/release to be slightly slow. My 2nd limiter would push the loudness to the levels i was targeting being Spotify's -14 LUFs. Although this is the standard for streaming services I have learnt to make my masters slightly "hot" meaning to push it a bit further than the loudness target as most streaming services have the option to disable loudness which then would leave your mastered track sounding weak amongst other Hot masters in a listeners playlist of songs.
Summary
Looking back on this task my main challenges was achieving a true hybrid genre fusion and managing a way in making every sound work well and compliment each other. Looking back at my previous hybrid genre I was happy that in this project I joined or fused the genres instead of separating them as it felt much more of a hybrid genre. I struggled a lot in my guitar performance and thankfully with the use of time correction I was able to overcome this problem with the use of software. My Final mixing and mastering stage was very challenging requiring critical listening and restraints in making changes with no reasoning behind it which usually guilty of doing. I also had learnt not to over process audio if it already sounds good. Overall this project taught me how to merge genres better, manage my mixing and mastering workflow better by being decisive and objective in decisions and method of work.